SFML и Code::Blocks (MinGW)

Introduction

This tutorial is the first one you should read if you’re using SFML with the Code::Blocks IDE, and the GCC compiler (this is the default one). It will explain how to configure your SFML projects.

Installing SFML

First, you must download the SFML SDK from the download page.

There are multiple variants of GCC for Windows, which are incompatible with each other (different exception management, threading model, etc.). Make sure you select the package which corresponds to the version that you use. If you are unsure, check which of the libgcc_s_sjlj-1.dll or libgcc_s_dw2-1.dll files is present in your MinGW/bin folder. If MinGW was installed along with Code::Blocks, you probably have an SJLJ version.
If you feel like your version of GCC can’t work with the precompiled SFML libraries, don’t hesitate to build SFML yourself, it’s not complicated.

You can then unpack the SFML archive wherever you like. Copying headers and libraries to your installation of MinGW is not recommended, it’s better to keep libraries in their own separate location, especially if you intend to use several versions of the same library, or several compilers.

Creating and configuring a SFML project

The first thing to do is choose what kind of project to create. Code::Blocks offers a wide variety of project types, including an “SFML project”. Don’t use it! It hasn’t been updated in a long time and is likely incompatible with recent versions of SFML. Instead, create an Empty project. If you want to get rid of the console, in the project properties, go to the “Build targets” tab and select “GUI application” in the combo box instead of “Console application”.

Now we need to tell the compiler where to find the SFML headers (.hpp files), and the linker where to find the SFML libraries (.a files).

In the project’s “Build options”, “Search directories” tab, add:

  • The path to the SFML headers (<sfml-install-path>/include) to the Compiler search directories
  • The path to the SFML libraries (<sfml-install-path>/lib) to the Linker search directories

These paths are the same in both Debug and Release configuration, so you can set them globally for your project.
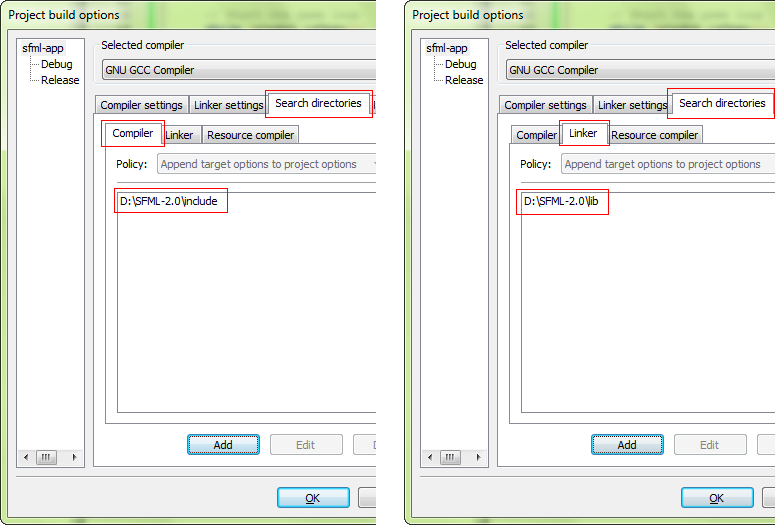
Screenshot of the dialog box for setting up the search paths

The next step is to link your application to the SFML libraries (.a files) that your code will need. SFML is made of 5 modules (system, window, graphics, network and audio), and there’s one library for each of them.
Libraries must be added to the “Link libraries” list in the project’s build options, under the “Linker settings” tab. Add all the SFML libraries that you need, for example “sfml-graphics”, “sfml-window” and “sfml-system” (the “lib” prefix and the “.a” extension must be omitted).
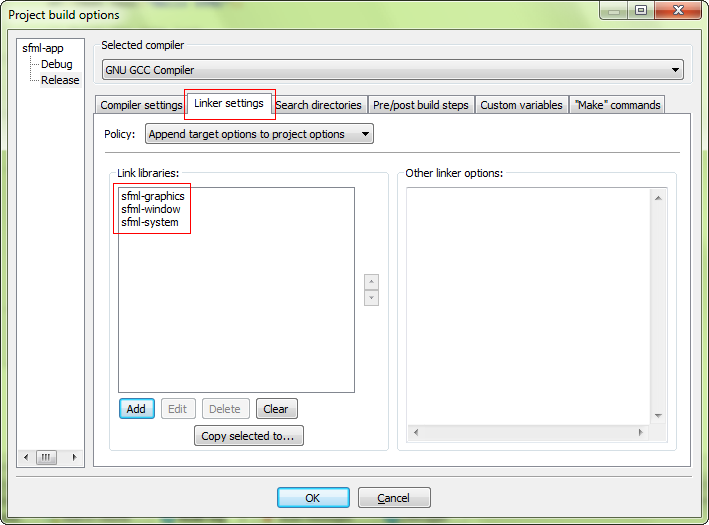
Screenshot of the dialog box for setting up the project's libraries

It is important to link to the libraries that match the configuration: “sfml-xxx-d” for Debug, and “sfml-xxx” for Release. A bad mix may result in crashes.

When linking to multiple SFML libraries, make sure that you link them in the right order, it is very important for GCC. The rule is that libraries that depend on other libraries must be put first in the list. Every SFML library depends on sfml-system, and sfml-graphics also depends on sfml-window. So, the correct order for these three libraries would be: sfml-graphics, sfml-window, sfml-system — as shown in the screen capture above.

The settings shown here will result in your application being linked to the dynamic version of SFML, the one that needs the DLL files. If you want to get rid of these DLLs and have SFML directly integrated into your executable, you must link to the static version. Static SFML libraries have the “-s” suffix: “sfml-xxx-s-d” for Debug, and “sfml-xxx-s” for Release.
In this case, you’ll also need to define the SFML_STATIC macro in the preprocessor options of your project.
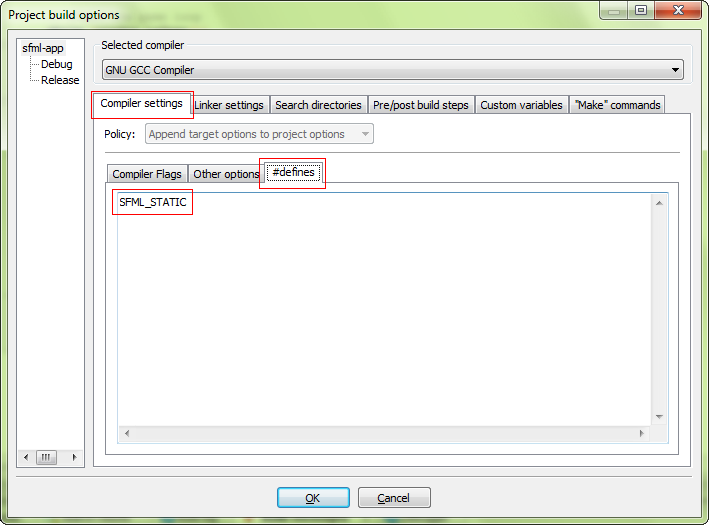
Screenshot of the dialog box for defining the SFML_STATIC macro

Starting from SFML 2.2, when static linking, you will have to link all of SFML’s dependencies to your project as well. This means that if you are linking sfml-window-s or sfml-window-s-d for example, you will also have to link opengl32, winmm and gdi32. Some of these dependency libraries might already be listed under “Inherited values”, but adding them again yourself shouldn’t cause any problems.

Here are the dependencies of each module, append the -d as described above if you want to link the SFML debug libraries:

Module Dependencies
sfml-graphics-s
  • sfml-window-s
  • sfml-system-s
  • opengl32
  • freetype
  • jpeg
sfml-window-s
  • sfml-system-s
  • opengl32
  • winmm
  • gdi32
sfml-audio-s
  • sfml-system-s
  • openal32
  • flac
  • vorbisenc
  • vorbisfile
  • vorbis
  • ogg
sfml-network-s
  • sfml-system-s
  • ws2_32
sfml-system-s
  • winmm

You might have noticed from the table that SFML modules can also depend on one another, e.g. sfml-graphics-s depends both on sfml-window-s and sfml-system-s. If you static link to an SFML library, make sure to link to the dependencies of the library in question, as well as the dependencies of the dependencies and so on. If anything along the dependency chain is missing, you willget linker errors.

Additionally, because Code::Blocks makes use of GCC, the linking order does matter. This means that libraries that depend on other libraries have to be added to the library list before the libraries they depend on. If you don’t follow this rule, you will get linker errors.

If you are slightly confused, don’t worry, it is perfectly normal for beginners to be overwhelmed by all this information regarding static linking. If something doesn’t work for you the first time around, you can simply keep trying always bearing in mind what has been said above. If you still can’t get static linking to work, you can check the FAQ and the forum for threads about static linking.

If you don’t know the differences between dynamic (also called shared) and static libraries, and don’t know which one to use, you can search for more information on the internet. There are many good articles/blogs/posts about them.

Your project is ready, let’s write some code now to make sure that it works. Add a “main.cpp” file to your project, with the following code inside:

#include <SFML/Graphics.hpp>
int main() { sf::RenderWindow window(sf::VideoMode(200, 200), "SFML works!"); sf::CircleShape shape(100.f); shape.setFillColor(sf::Color::Green); while (window.isOpen()) { sf::Event event; while (window.pollEvent(event)) { if (event.type == sf::Event::Closed) window.close(); } window.clear(); window.draw(shape); window.display(); } return 0; }

Compile it, and if you linked to the dynamic version of SFML, don’t forget to copy the SFML DLLs (they are in <sfml-install-path/bin>) to the directory where your compiled executable is. Run it, and if everything works you should see this:
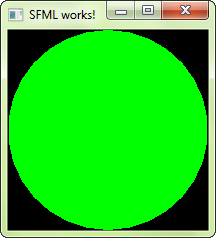
Screenshot of the Hello SFML application

If you are using the sfml-audio module (regardless whether statically or dynamically), you must also copy the DLL of the external library needed by it, which is OpenAL32.dll.
These files can be found in <sfml-install-path/bin> too.

Буду благодарен, если поделитесь:

Уроки SFML

Уроки SFML от пользователей сайта kychka-pc.ru

Выберите подходящую ветку и создавайте свои уроки, если таковой ветки нет – создайте её.

Буду благодарен, если поделитесь:

SFML – Начало работы

Официальная документация по началу работы и первоначальной настройке

Буду благодарен, если поделитесь:

SFML и Visual studio

Введение

Эта инструкция есть то, что Вы должны прочитать, если собираетесь использовать SFML совместно со средой разработки Visual Studio (Visual C++ компилятор). It will explain how to configure your SFML projects.

ДРУЗЬЯ, ВОТ ВАМ НЕКОТОРЫЕ ССЫЛКИ НА МОИ ПЕРЕВОДЫ 2х ЛЕТНЕЙ ДАВНОСТИ, МОЖЕТЕ ИМИ ВОСПОЛЬЗОВАТЬСЯ И КОЕ ГДЕ ПОДКОРРЕКТИРОВАТЬ, ЗАТЕМ КОГДА ВСЁ УЖЕ БУДЕТ ГОТОВО – УДАЛИТЕ ЭТОТ ТЕКСТ С ЭТИМИ ССЫЛКАМИ. НЕ ЗАБЫВАЙТЕ ДАВАЙТЬ ССЫЛКИ НА ИСТОЧНИКИ:) НЕ ЗАБУДЬТЕ ПРОЧИТАТЬ ИНСТРУКЦИЮ К СВОБОДНОЙ БАЗЕ ЗНАНИЙ 

https://yadi.sk/i/xj1CfzL4kJnri

https://yadi.sk/i/U8kpE1ndkJnvA

https://yadi.sk/i/Yyr759gMkJoBU

https://yadi.sk/i/L7sUR3dCkJoDA

https://yadi.sk/i/ImxBNawokJoGD

Обращаю Ваше внимание что мои переводы старые и могут не совпадать с текущими, так же проверьте на корректность перевода и правильность, потому что тогда мой уровень английского был “так себе” )

Установка SFML

Сначала, скачайте SFML SDK с официального сайта.

Вы должны скачать тот SDK, который сопоставим с вашей версиец Visual C++.  Например, библиотека, скомпилированная для VC++ 10 (Visual Studio 2010), несовместима с VC++ 12 (Visual Studio 2013). Если вы не нашли нужного SDK для вашей версии Visual C++, нужно самому скомпилировать SFML.

Вы можете распаковать SFML куда хотите. Копировать заголовочные файлы и библиотеки в папку к установленной Visual Studio не рекомендуется. Лучше хранить SFML в отдельной папке, особенно если вы намерены использовать несколько версий библиотеки или различные компиляторы.

Создание и настройка SFML проекта

Первым делом, создаем проект типа “Win32 application”. Конструктор предложит настроить некоторые опции проекта: выберите “Console application”, если вам нужна консоль или “Windows application”, если консоль не нужна. Поставьте галочку на “Empty project”, если не хотите возиться с авто сгенерированным кодом.
Далее, создайте main.cpp файл и добавьте к проекту, так мы получим доступ к настройкам C++(иначе, Visual Studio не узнает, какой язык будет использован в этом проекте). Что писать в этом файле, мы объясним позже

Сейчас, нужно сказать компилятору, где искать SFML заголовки (.hpp файлы), а linker’у, где SFML библиотеки (.lib файлы).

В свойствах проекта добавьте:

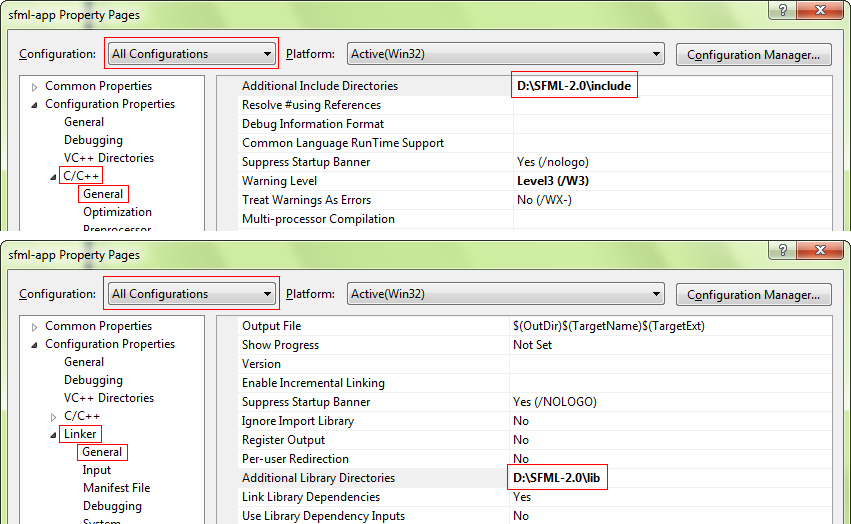
  • The path to the SFML headers (<sfml-install-path>/include) to C/C++ » General » Additional Include Directories
  • The path to the SFML libraries (<sfml-install-path>/lib) to Linker » General » Additional Library Directories

These paths are the same in both Debug and Release configuration, so you can set them globally for your project (“All configurations”).

Screenshot of the dialog box for setting up the search paths

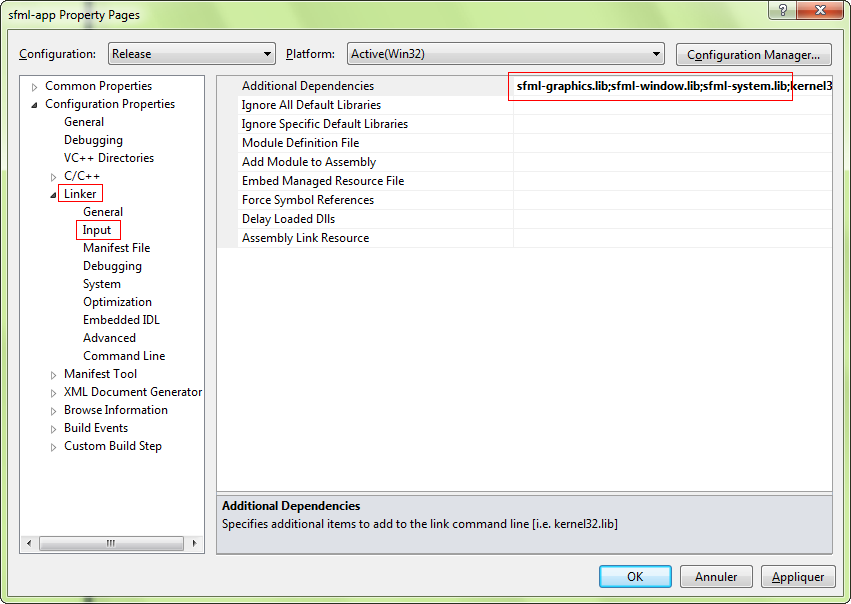
Следующий шаг – добавить нужные файлы библиотек (.lib). SFML состоит из 5 модулей (system, window, graphics, network and audio) для каждого требуется своя библиотека. Библиотеки должны быть добавлены в свойствах проекта

Linker » Input » Additional Dependencies

(Компоновщик » Ввод » Дополнительные зависимости)

Добавьте те библиотеки которые вам нужны. Например  “sfml-graphics.lib”, “sfml-window.lib” и “sfml-system.lib”.

Screenshot of the dialog box for setting up the project's libraries

Важно добавлять библиотеки соответствующие конфигурации: “sfml-xxx-d.lib” для отладки, и “sfml-xxx.lib” для релиза.

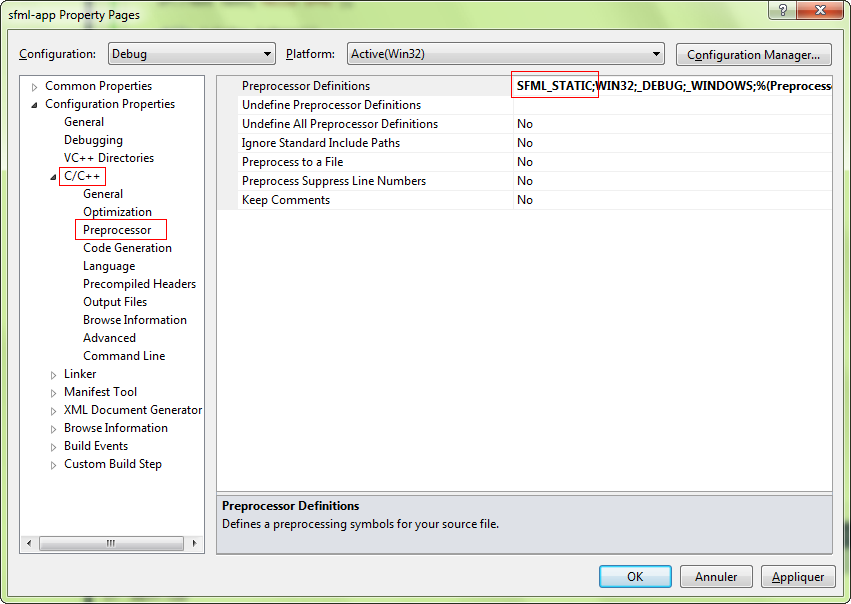
The settings shown here will result in your application being linked to the dynamic version of SFML, the one that needs the DLL files. If you want to get rid of these DLLs and have SFML directly integrated into your executable, you must link to the static version. Static SFML libraries have the “-s” suffix: “sfml-xxx-s-d.lib” for Debug, and “sfml-xxx-s.lib” for Release.
In this case, you’ll also need to define the SFML_STATIC macro in the preprocessor options of your project.

Screenshot of the dialog box for defining the SFML_STATIC macro

Начиная с SFML 2.2 для статической линковки вам придется прилинковать все зависимости SFML. This means that if you are linking sfml-window-s.lib or sfml-window-s-d.lib for example, you will also have to link opengl32.lib, winmm.lib and gdi32.lib. Some of these dependency libraries might already be listed under “Inherited values”, but adding them again yourself shouldn’t cause any problems.

Зависимости для каждого модуля, добавьте суффикс -d если вы хотите прилинковать SFML для отладки.

Module Dependencies
sfml-graphics-s.lib
  • sfml-window-s.lib
  • sfml-system-s.lib
  • opengl32.lib
  • freetype.lib
  • jpeg.lib
sfml-window-s.lib
  • sfml-system-s.lib
  • opengl32.lib
  • winmm.lib
  • gdi32.lib
sfml-audio-s.lib
  • sfml-system-s.lib
  • openal32.lib
  • flac.lib
  • vorbisenc.lib
  • vorbisfile.lib
  • vorbis.lib
  • ogg.lib
sfml-network-s.lib
  • sfml-system-s.lib
  • ws2_32.lib
sfml-system-s.lib
  • winmm.lib

You might have noticed from the table that SFML modules can also depend on one another, e.g. sfml-graphics-s.lib depends both on sfml-window-s.lib and sfml-system-s.lib. If you static link to an SFML library, make sure to link to the dependencies of the library in question, as well as the dependencies of the dependencies and so on. If anything along the dependency chain is missing, you willget linker errors.


If you are slightly confused, don’t worry, it is perfectly normal for beginners to be overwhelmed by all this information regarding static linking. If something doesn’t work for you the first time around, you can simply keep trying always bearing in mind what has been said above. If you still can’t get static linking to work, you can check the FAQ and the forum for threads about static linking.

If you don’t know the differences between dynamic (also called shared) and static libraries, and don’t know which one to use, you can search for more information on the internet. There are many good articles/blogs/posts about them.

Your project is ready, let’s write some code now to make sure that it works. Put the following code inside the main.cpp file:


If you chose to create a “Windows application” project, the entry point of your code has to be set to “WinMain” instead of “main”. Since it’s Windows specific, and your code would therefore not compile on Linux or Mac OS X, SFML provides a way to keep a standard “main” entry point in this case: link your project to the sfml-main module (“sfml-main-d.lib” in Debug, “sfml-main.lib” in Release), the same way you linked sfml-graphics, sfml-window and sfml-system.

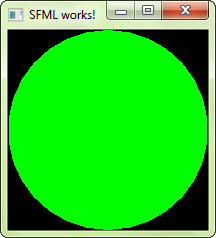
Now compile the project, and if you linked to the dynamic version of SFML, don’t forget to copy the SFML DLLs (they are in <sfml-install-path/bin>) to the directory where your compiled executable is. Run it, and if everything works you should see this:

Screenshot of the Hello SFML application

If you are using the sfml-audio module (regardless whether statically or dynamically), you must also copy the DLL of the external library needed by it, which is OpenAL32.dll.
These files can be found in <sfml-install-path/bin> too.

Буду благодарен, если поделитесь: